Hello, I am new to this forum. It looks like a great place to share information about Krags. I just picked up a 1898 rifle that basically looks unmolested. The bore looks a little frosted, but it does gauge at a 2 on a bore gauge with good rifling. I'm hoping that it will be a good shooter.
I've field stripped it as far as I want to go except for the magazine. The inside of the gate and all the related parts are pretty dirty with grease and dirt. I've been searching for instructions (preferably a video) on how to remove the gate, but came up with some less than detailed instructions on ehow.
Can anyone point me in the right direction? I figure that if I can get the gate off, I can easily clean everything else without a complete disassembly.
Thanks,
Darrel
Hello. I'm new to the forum
-
butlersrangers
- Posts: 9880
- Joined: Wed Oct 07, 2009 11:35 pm
- Location: Below the Bridge, Michigan
Re: Hello. I'm new to the forum
Darrel: Welcome to the KCA Forum!
I'm not much of one for 'gun disassembly' videos. So many seem very badly done. I always learned best by reading, studying accurate drawings, and then by doing.
The Krag was designed well, for being serviced. Some hints:
1. Have a set of properly fitting screwdrivers and put Hoppe's #9 or penetrating oil on screws and parts you wish to remove.
2. Do not pull the wood hand-guard off the barrel or 'snap it' back on. It will likely crack. Remove barrel & action from stock, remove rear-sight and sight screws, and then slide hand-guard toward muzzle, as the barrel tapers, the hand-guard can easily be removed. Store hand-guard with a quarter and a nickel twisted into 'spring-clips', to neutralize spring tension. (Note, the front barrel-band cannot be removed from most Krag rifles until the front sight blade is removed. Normally, front band can just be left on).
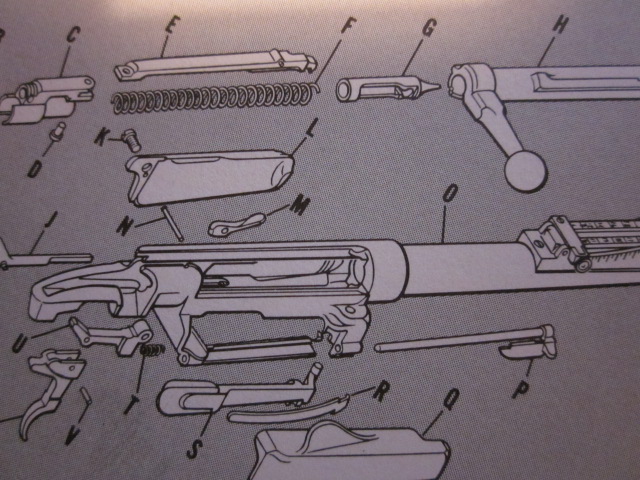
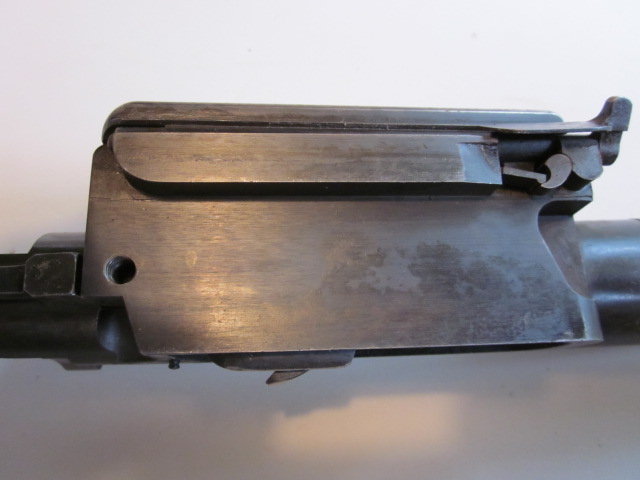
3. Remove the left side-plate from the action. This allows follower-arm to project out, reducing compression of follower/magazine gate spring.
4. Rotate Gate Hinge Pin. (There is a 'flat spring/cover' you may have to lift, attached at the front end of the Pin, in order to rotate the Pin).
5. While holding the Gate closed against the Receiver (a large "C" clamp or padded vise is helpful), slightly rotate Hinge-Pin (back & forth), while pulling it forward out of the receiver. Once the pin is removed, the magazine parts can easily be taken out. Do not take the follower/follower-arm assembly apart after you remove it from the receiver (not necessary). Reassembly is aided by filing or stoning any burrs on tip of hinge-pin.
I'm not much of one for 'gun disassembly' videos. So many seem very badly done. I always learned best by reading, studying accurate drawings, and then by doing.
The Krag was designed well, for being serviced. Some hints:
1. Have a set of properly fitting screwdrivers and put Hoppe's #9 or penetrating oil on screws and parts you wish to remove.
2. Do not pull the wood hand-guard off the barrel or 'snap it' back on. It will likely crack. Remove barrel & action from stock, remove rear-sight and sight screws, and then slide hand-guard toward muzzle, as the barrel tapers, the hand-guard can easily be removed. Store hand-guard with a quarter and a nickel twisted into 'spring-clips', to neutralize spring tension. (Note, the front barrel-band cannot be removed from most Krag rifles until the front sight blade is removed. Normally, front band can just be left on).
3. Remove the left side-plate from the action. This allows follower-arm to project out, reducing compression of follower/magazine gate spring.
4. Rotate Gate Hinge Pin. (There is a 'flat spring/cover' you may have to lift, attached at the front end of the Pin, in order to rotate the Pin).
5. While holding the Gate closed against the Receiver (a large "C" clamp or padded vise is helpful), slightly rotate Hinge-Pin (back & forth), while pulling it forward out of the receiver. Once the pin is removed, the magazine parts can easily be taken out. Do not take the follower/follower-arm assembly apart after you remove it from the receiver (not necessary). Reassembly is aided by filing or stoning any burrs on tip of hinge-pin.
Re: Hello. I'm new to the forum
3. Remove the left side-plate from the action. This allows follower-arm to project out, reducing compression of follower/magazine gate spring.
4. Rotate Gate Hinge Pin (There is a 'flat spring/cover' you may have to lift at the front end of the Pin).
5. While holding the Gate closed against the Receiver (a large "C" clamp or padded vise is helpful), slightly rotate Hinge-Pin (back & forth), while pulling it forward out of the receiver. Once the pin is removed, the magazine parts can easily be taken out. Do not take the follower/follower-arm assembly apart after you remove it from the receiver (not necessary). Reassembly is aided by filing or stoning any burrs on tip of hinge-pin.
Step 4 is the key for me. Rotating and removing the pin was the part I couldn't nail down. I didn't know if a spring was going to go flying and I didn't want to force anything.
Thanks!
-
Mark_Daiute
- Posts: 248
- Joined: Fri Jul 11, 2003 9:49 pm
Re: Hello. I'm new to the forum
I'll breath easier when you have the loading gate re-assembled and know that nothing happened to the hinge pin.
Let us know how it goes, or is it already back together?
Let us know how it goes, or is it already back together?
-
butlersrangers
- Posts: 9880
- Joined: Wed Oct 07, 2009 11:35 pm
- Location: Below the Bridge, Michigan
Re: Hello. I'm new to the forum
Mark: If the hinge-pin is straight and free of burrs, re-assembly is not difficult. The long hole through the magazine-gate should be cleaned with a Hoppe's soaked pipe-cleaner.
Parts can be 'test assembled', minus the gate/follower spring, to check alignment and ease of fit.
A padded clamp or vise, pressing the gate against the gate/follower spring, makes reassembly very easy.
Parts can be 'test assembled', minus the gate/follower spring, to check alignment and ease of fit.
A padded clamp or vise, pressing the gate against the gate/follower spring, makes reassembly very easy.
Re: Hello. I'm new to the forum
I'll breath easier when you have the loading gate re-assembled and know that nothing happened to the hinge pin.
Let us know how it goes, or is it already back together?
I actually haven't got it taken out yet. A buddy wanted to go shooting so I couldn't pass that up. I took the Krag and a box of Remington with me. Windage was spot on. Elevation was about 10 inches high at 100 yards. Could have been me. It has the 1902 site with the adjustable windage knob. I was using the little peep site. The peep looks like it sits a little higher than the notch so I'm wondering what the distance setting is for the peep? 300 yards? A ballistics program that I use shows that a 300 yard zero should put me about 7 inches high at 100 yards so maybe I'm close.
Unfortunately, I now may have a bigger issue than the hinge pin. When I brought it home from the range, I noticed a hairline crack at the receiver tang about an inch long and possibly a hairline crack on the right side coming straight back from the corner of the right angle cut. I took the receiver out of the wood and can see that the tight crack on top is a little over an 1/8 inch deep.
I don't recall seeing these issues before I shot the gun so I'm assuming that it's due to the shooting session. The receiver bolts were tight so I don't think that loose bolts caused a problem.
I don't want to shoot it again until I get this resolved. Do these cracks ever stabilize? What would be the best way to repair so it's not visible from the outside? Can I just shim the action into the stock using stiff paper so it's a really snug fit?
I'll attach pictures if anyone would like to see.
-
butlersrangers
- Posts: 9880
- Joined: Wed Oct 07, 2009 11:35 pm
- Location: Below the Bridge, Michigan
Re: Hello. I'm new to the forum
'wdmzu': I am guessing the 'cracks' you mention are in the wood gunstock? Epoxy glass-bedding is the best solution. You may have to drill hidden blind holes to work epoxy mixture into cracked area.
Psteinmayer has a thread, somewhere on this site, where there was extensive discussion of stock repair last Spring.
BTW: When tightening Krag trigger-guard screws, the front screw is tightened very firmly. The rear screw is just snugged up. Too much tension on the rear screw is not good, may cause barrel to 'lift' in its channel, and potentially may aggravate split at tang.
Re: Hello. I'm new to the forum
'wdmzu': I am guessing the 'cracks' you mention are in the wood gunstock? Epoxy glass-bedding is the best solution. You may have to drill hidden blind holes to work epoxy mixture into cracked area.
Psteinmayer has a thread, somewhere on this site, where there was extensive discussion of stock repair last Spring.
BTW: When tightening Krag trigger-guard screws, the front screw is tightened very firmly. The rear screw is just snugged up. Too much tension on the rear screw is not good, may cause barrel to 'lift' in its channel, and potentially may aggravate split at tang.
Yes, it's the woodstock. I'll find the thread on stock repair. Thanks for the advice on snugging the rear screw.
Re: Hello. I'm new to the forum
Thanks to Butlersrangers for bringing back the post about the cracked stock! I read it this morning, and it comes really close to what I have going on.
I talked to my gunsmith last night, and his recommendation was exactly what was in the post. Drill a small parallel hole down the crack. Clean with acetone. Fill with accuglass. Use a wooden dowel to put hydraulic pressure in order to push the accuglass into the wood.
I took the rifle apart again, and noticed that the receiver doesn't seem to drop down nicely into the stock: it seems to have a bit of a twist with the right side just a bit higher in the tang area than the left side. Tightening the action screws levels things out, but I can see a problem if there isn't equal pressure on both sides of the stock/ receiver contact areas. I'll have my gunsmith check/fix the bedding.