Page 1 of 1
krag side plate screw
Posted: Mon Nov 07, 2016 8:28 pm
by porthos
bought an older (there all old)reciever sight for my 1896 . like most , after removing the side plate screw it is attached to the reciever with that screw. unfortunately that screw is a little short. it only grabs by about 2 threads. here's my problem this sight (no name) is made so that in order to remove the bolt for cleaning; i have to run the elevation all the way up and remove that part off the sight. no other way. i would rather remove the sight by taking out the screw. but with only a couple threads holding i think that they will "strip" after x number of removal's. can anyone tell me what the thread pitch is; maybe i can make one on the lathe. or, better yet tell me where i might buy a longer screw. ( i'm not really very good on the lathe. and last before anyone asks. no the sight does NOT slide out like lymans and other manufactures. any help??
Re: krag side plate screw
Posted: Tue Nov 08, 2016 12:22 pm
by psteinmayer
Sounds like you have a Redfield (either 70K or 102K). Redfields are great no-drill receiver sights! These come with a slightly longer replacement screw when new which you must use. You'll need to find someone who has an extra... or a Redfield that they're not using.
Re: krag side plate screw
Posted: Mon Nov 14, 2016 5:14 pm
by OIF-Retread
i just removed a redfield sight (not sure of model number, i'll check later) with the intention of restoring an 1898 rifle ('03 build) from sporter to milspec.
it has the longer screw; you are welcome to both the sight and screw. if you want it, let me know. if it fits, you can just reimburse me shipping, or send me your side plate screw.
mike
Re: krag side plate screw
Posted: Mon Nov 14, 2016 6:32 pm
by butlersrangers
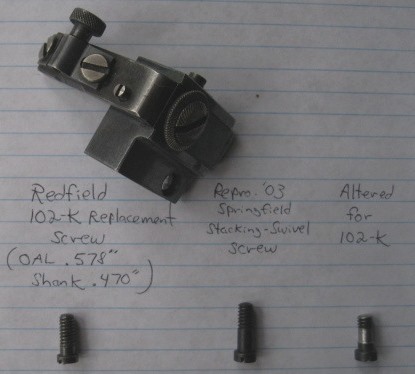
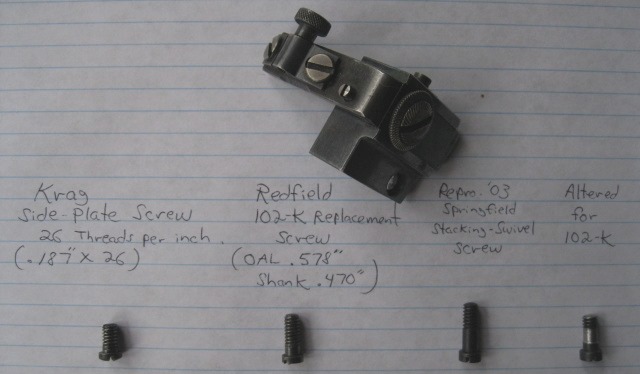
A longer Krag side-plate screw can be improvised by using a reproduction 1903 Springfield rear swivel screw or front stacking swivel screw.
These commonly available screws use the same 26 TPI thread that the Krag side-plate screw utilizes.
All that is required is shortening the 1903 swivel screw, reducing the diameter of some of the shank above the threads, and slightly reducing the screw-head diameter (if necessary).
The 'reduction in diameter' can be done with small files, while turning the 1903 screw in a drill 'Chuck'. (This is best done before shortening the screw).
Re: krag side plate screw
Posted: Tue Nov 15, 2016 2:35 pm
by Hoot
A longer Krag side-plate screw can be improvised by using a reproduction 1903 Springfield rear swivel screw or front stacking swivel screw.
These commonly available screws use the same 26 TPI thread that the Krag side-plate screw utilizes.
All that is required is shortening the 1903 swivel screw, reducing the diameter of some of the shank above the threads, and slightly reducing the screw-head diameter (if necessary).
The 'reduction in diameter' can be done with small files, while turning the 1903 screw in a drill 'Chuck'. (This is best done before shortening the screw).
Wonderful information!
Thank you!
Hoot (who needs a screw for a 102)
Re: krag side plate screw
Posted: Tue Dec 13, 2016 3:41 pm
by Howard31+
I recommend getting the Sling swivel screw in stead of the Stacking swivel screw because it has more threads . Numrich has the screws for the Krag Sling swivel cheaper than anyone else . I have screws if you need one . I also have a 10-26 Die on ebay . Love the Redfield . Had the 102K switch for the Target Knobs . TGT Knobs definitely better
Re: krag side plate screw
Posted: Tue Dec 13, 2016 4:49 pm
by butlersrangers
Actually, I believe the 'stacking-swivel' screw has more threads than the 'sling-swivel' screw. However, the screws can be mixed and still work (and probably often were mixed up).
It doesn't really matter, either can be made to work. Original swivel screws will often have the tip 'upset' or 'mushroomed'. It is best to use a reproduction screw and save an original from destruction.
It is necessary to reduce the diameter of some of the unthreaded shank so the screw can enter deep enough to firmly 'clamp' the sight base against the receiver.
(I probably could have left a couple of more threads on the altered screw in the picture, but, it works fine):